YourPictureFrames.com Blog

YourPictureFrames.com Blog

800-780-0699

M-F 9am-5pm PST

  • Back to Our Store
  • About Your Picture Frames
  • News
  • Photography
  • Featured Artists
  • Tutorials
Home Archives for Photography

Underwater Photography Tips

May 28, 2010 By Alisha


Photo Courtesy of UnderwaterCamerasPlus.com


I love the ocean and have always been fascinated with underwater wildlife.  I once tried to take some pictures underwater but didn’t have much luck.

So, when I saw this great article on taking underwater pictures I couldn’t resist. This article from the website, Underwater Cameras Plus, gives some great tips on underwater photography.  If you’re interesting in learning how to take great underwater pictures, then you should check out this underwater photography article. This article offers some practical tips to avoiding the following common problems that many underwater pictures have:

  • Lack of vibrant colors- pictures have a blue or blue-green tint to them
  • White circles or dots that look like snow covering the image
  • Fuzzy or blurry pictures
  • No sharpness between the subject and the background

If you’re interested in underwater photography, then this underwater photography article can certainly offer you some practical advice.

And, sorry about the fuzzy picture of the Dragon Moray Eel but I couldn’t resist his smile 😛

Filed Under: Photography

Kids Cameras – How to Select One for Your Child

May 21, 2010 By Alisha

Getting your children involved in taking pictures can be a fun way for your kids to express their creativity and learn some great life lessons.

For me, I got my first camera when I was five years old. It was a little Kodak Instamatic X-15F camera. I not only learned how to take pictures, but I also learned a lot of important lessons. At that time, not many children had cameras so it really helped teach me responsibility and to appreciate my belongings.

These days, kids are more accustomed to cameras so choosing a camera for a child is a lot different. These days, many kids are more concerned with how the camera looks than the sheer joy of taking pictures.

So, here are a few things to consider when shopping for a camera for your child:

  • Ease of use
  • Camera size
  • Camera features

When choosing a camera for your child, the age of your child really makes a huge difference. The younger your child, the simpler the camera should be with large easy to use buttons. The size should also be something the child can easily handle. For younger children, a little larger camera is better while with older kids smaller cameras are better. That’s because as kids gets older their fine motor control improves. In terms of camera features, you should choose a camera with very few features for a young child, but the older the child is the more features it can have. And since kids these days are so comfortable with technology, they should have no problem learning how to use a camera.

Filed Under: Photography

Insects Pictures – How to Take Good Insect Pictures

February 12, 2010 By Alisha

Today’s post is all about the wonderful world of “bugs.” That’s right- bees, butterflies, dragonflies, beetles, spiders and so many others that help “make the world go round.”

Since  insects often get a bad rap, here are some simple tips on how you can take some fascinating insect pictures.  So, let’s give these little bugs the attention they deserve.

Photo Courtesy of Luc Viatour

Tip #1- Macro Time

This may be stating the obvious, but you need to use a macro lens or macro mode. Stay within the macro range and keep the camera extremely still and you’ll get some nice sharp images. If you’re not sure how close to get, look at your camera manual.

Tip #2 – Don’t Breathe

When taking up close pictures of insects you will need to hold your breath. That’s because most insects are sensitive to carbon dioxide and will fly or run away if you breath directly on them. There are some exceptions to this rule as some beetles will actually freeze if you breathe on them. However, once you breathe on them and they take off it’s too late to get their shot so it’s generally best to hold your breath.

Tip #3 – Start Early

Insects actually slow down with cooler temperatures, so if you want to make it easier on yourself take pictures early in the morning or at twilight when the temperatures are cooler.

Tip #4 – Watch Your Shadow

Insects can see shadows very well so never approach them from the same direction as the light casts. They’ll spot your shadow quickly and will be sure to take off before you even get your camera out.

Photo Courtesy: Luc Viatour

Tip #5 – Proper Composition

Just like any close up picture you should use proper composition techniques. By filling the frame with the subject and using composition techniques like “rule of thirds” you can make sure to shoot an eye catching photograph.

Tip #6- Know Your Insect

Anytime you’re taking pictures of wildlife -whether animals or insects- you should have a basic understanding of your subject. By understanding their patterns of behavior and what types of plants or environments they prefer you’ll be more likely to get a good shot. You should also know if the insect you’re shooting is poisonous or dangerous as there are some types of spiders and insects with powerful or lethal venom. Sure, it may be unlikely but it is always worth knowing.

Insects can certainly be one of the most challenging subjects to photograph so hopefully these simple tips will help you photograph a truly eye catching image.

Thank you to Viatour Luc for the use of his two insect images!

Filed Under: Photography Tagged With: insects

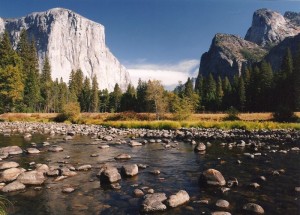
Mastering Landscape Photography Tips

February 8, 2010 By Alisha

If you’re interested in mastering landscape photography then there are two important keys to taking great landscape pictures: lighting and composition. Since both of these important concepts can make an enormous difference in the quality and appeal of your landscape photos, here are some tips you can start using right away.

Quality of Light

Lighting quality can make a significant difference in the quality and impact of your photograph. You want to get familiar with the different types and intensities of lights  so you can best use them to enhance your landscape photograph.

Here are some tips for how you can use different types of light:

  • For lighting that is soft and has an even, warm look take your landscape pictures during the “Golden Hours” which is the first hour after dawn and the last hour before sunset.
  • For more intense colors and subdued highlights, shoot under an overcast sky.
  • For dramatic shadows, shoot under a cloudy sky.
  • For extra eye catching appeal and added drama to your photograph, look for landscapes where there are contrasting colors or tones.
  • For a super soft or ethereal effect, shoot on a foggy day.

Composition

Composition is one of the most important elements in photography and is critical to learn if you want to master landscape photography. There is a lot you can learn about composition, so here are just a few tips you can start applying to your photography right away.

  • Fill two-thirds (2/3) of your frame or viewfinder with the subject of your landscape picture. Your subject could be a rock outcropping, a tree or a dramatic sky.
  • Look for lines, curves or patterns that can draw your eye toward the subject in your landscape photo. For example, it could be a road leading to the subject of your photo or lines in the sand that lead your eye to the subject of your picture.
  • Watch out for clutter or distracting items in the background. This could be anything from litter on the ground to power lines going through your scenic skyline.
  • Compose your photo with a point of interest in the foreground that is separate from your picture’s subject. This is intended to draw the eye in and add interest to your landscape photograph.
  • Position the subject of your photo using the “rule of thirds” so your subject isn’t always directly centered in your photograph. The rule of thirds is a technique where you imagine your picture divided into a grid pattern of 9 equal parts and focus on placing your subject and interest areas along those grid lines or intersections.

Although there is much more to discuss on lighting and composition, these tips will give you a starting point so you can start seeing a difference in the quality of your landscape pictures.

Landscape photographs courtesy of Byron Lee.

Filed Under: Photography Tagged With: landscape photography

  • « Previous Page
  • 1
  • 2
  • 3
  • 4
  • 5
  • Next Page »

Categories

  • Commentary (15)
  • Contests (1)
  • Crafts (1)
  • Easels (2)
  • Featured Artists (5)
  • News (99)
  • Photo Albums (1)
  • Photography (17)
  • Picture Frames (32)
  • Preservation (4)
  • Software (1)
  • Summary (66)
  • Tutorials (1)
  • Video (1)

Recent Posts

  • 7 Ways We Can Help Children Evolve
  • What Is Transitional Style And Why You’ll Love It
  • How To Stop Procrastinating After 50
  • Decorating a Small Home on a Budget
  • 10 BEAUTIFUL FALL IDEAS TO DO NOW

Archives

  • October 2021
  • September 2021
  • July 2021
  • May 2021
  • April 2021
  • March 2021
  • February 2021
  • January 2021
  • August 2017
  • July 2017
  • June 2017
  • May 2017
  • April 2017
  • February 2017
  • January 2017
  • November 2013
  • October 2013
  • August 2013
  • June 2012
  • April 2012
  • March 2012
  • February 2012
  • June 2011
  • May 2011
  • April 2011
  • July 2010
  • June 2010
  • May 2010
  • April 2010
  • March 2010
  • February 2010
  • January 2010

Customer Service

  • Contact Us
  • Frequently Asked Questions
  • Returns

Company Information

  • Out Story
  • Customer Feedback
  • Back to Our Store
  • In the Press
  • Articles

Join Our Frame Club

Sign up for sales and specials
  • Security Verified Seal
  • Yourpictureframes.com is a BBB Accredited Business. Click for the BBB Business Review of this General Merchandise - Retail in Auburn CA

Copyright © 2025 Your Picture Frames