YourPictureFrames.com Blog

YourPictureFrames.com Blog

800-780-0699

M-F 9am-5pm PST

  • Back to Our Store
  • About Your Picture Frames
  • News
  • Photography
  • Featured Artists
  • Tutorials
Home 2010 Archives for February 2010

Archives for February 2010

How to Avoid Damaging Your Picture Frames and Photos

February 18, 2010 By Alisha

Old Photo
Image by zanaceabuna75 via Flickr

To help protect your photos and keep your picture frames looking great for years, here are four things you should do.

Avoid Direct Sunlight

The sun’s powerful rays are damaging to your pictures so you want to avoid displaying your picture frames in direct sunlight. This will help reduce fading of your pictures and wood photo frames.

However if you can’t avoid displaying your pictures where they have direct sunlight shining on them, there are a few things you can do. If you’re concerned about your pictures fading, you should first have them reproduced by a reputable photo restoration service. This way you will have a high quality copy of your picture that you keep in a safe place so you can replace your other picture once it begins to fade from the sun. For most people framing pictures this is the best solution if you have to have your picture displayed where sunlight shines on it.

If you’ve made a copy of your picture, and still want to protect the framed photo, then you can use UV glass or UV acrylic in your picture frame. UV glass or acrylic is more expensive so this is more frequently used for irreplaceable artwork like watercolors, fine art prints and drawings. Just keep in mind that when you use UV glass or acrylic it will reduce the UV exposure but it cannot 100% eliminate it. You may also want to consider using metal picture frames instead of wood as any solid wood will fade over time with direct sunlight.

Watch Out for Moisture

Often times we think of moisture or water damage caused by devastating problems like floods, but moisture damage can also be caused from everyday steam.  Make sure you avoid displaying your framed photos in areas like a bathroom or above a kitchen sink. Moisture damage can cause your picture to warp or can completely ruin it if your picture sticks to the glass. The best solution is to only put unimportant pictures in these areas, preferably in aluminum metal frames that won’t rust. Or, to avoid the problem altogether don’t display pictures in these areas.

Also, if you live in a climate with high humidity you should also be aware of picture frames or artwork with a sealed back. Sealed backs prevent the artwork or picture from breathing and, in a high humidity climate, they can trap moisture. You can spot a sealed back because they are usually taped or glued shut. To help avoid having moisture damage in a high humidity climate, you can use spacers or picture frame mats in your frame as they create an air pocket between the glass and picture. This will help prevent the picture from getting stuck to the glass.

Spray Cleaner Warning

This may seem rather obvious, but never spray glass cleaner on the glass of a picture frame when the picture or artwork is still inside. All it takes is a little drip of glass cleaner to seep underneath the glass and come in contact with your picture to damage it. Instead, always take your picture or artwork out of the frame before you ever clean the glass. And, when you  clean both sides of the glass, make sure the glass is properly dried with no cleaner residue on it before replacing your picture in the frame.

Never Stack Your Picture Frames

The last tip to avoid damaging your frames is to never stack your frames on top of each other. In the vast majority of cases, stacking your frames, will scratch the frame finish and permanently damage them. If you need to move your frames, just use a towel or other soft cover to put between each frame. It may take an extra couple of minutes but it will keep your frames looking nice for years.

Another common way frames get damaged is when people set the face of the frame down on a surface to remove the picture. This can easily scratch the frame so always lay a towel down on the surface before you take your frame apart.

If you remember these tips, your picture frames will be sure to retain their beauty and look great for many years to come!

Reblog this post [with Zemanta]

Filed Under: Picture Frames Tagged With: picture frame care

Bird Photography – How to Take Great Pictures

February 13, 2010 By Alisha

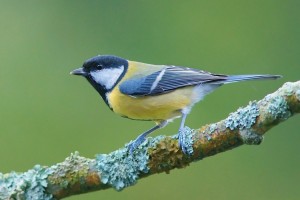
Photo Courtesy: Luc Viatour

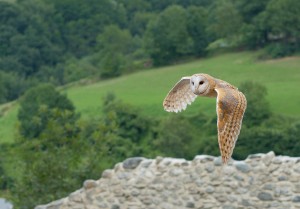
Bird photography is one of the most popular types of animal photography and can be one of the most difficult. The biggest challenge with taking bird pictures is getting the birds to perch exactly where you want them. So here are some tips for how to attract birds to your yard and how you can persuade them to perch on branches perfect for taking pictures.

The best way to get great bird pictures is to create a bird “photo shoot” and attract birds to your backyard.  So, here are a few tips in creating a bird friendly backyard.

Photo Courtesy: Luc Viatour

1) Create feeding stations and birdbaths in areas that are great for taking pictures (offer nice backgrounds). Try to have a background in a solid color like green, brown or black as this will make the bird really stand out in your image. Try to avoid areas with sunshine hot spots (that show as a bright white spots) as these will distract from the bird in the picture.

2) Choose a location that gives the birds a little protection and makes them feel safe from predators.

3) Determine what types of birds you want to attract and then find out what is the proper type of bird food to attract them. You can find out by checking with the Audubon Society or going to the National Wildlife Federation’s Gardening for Wildlife website for more information. It’s important to feed the birds properly with quality seed as if you give them “bread crumbs” during the winter they may fill up on this “junk food” and be unable to stay warm at night.

Photo Courtesy: Luc Viatour


4) Position bird feeders and bird baths near trees or shrubs that have areas easy for perching. By having the feeders near trees with low branches, this increases the chance the birds will land there before going to the feeder or bird bath.

Once you have a good position for your bird photo shoot, now you need to set up your camera for shooting. Normally, the best way to get a great bird picture is staking out a location and waiting for them to land.  This generally won’t take long if you have your feeding stations set up and established as a source of food. But for photographers who prefer to work on chance, you can occasionally get lucky when chasing birds from branch to branch. The only problem is that you have to hope the bird stays on the branch long enough for you to get the shot. So, here are some tips on setting up your camera.

Photo Courtesy: Luc Viatour

1) Since birds are so active, you will need a high shutter speed  of at least 1/250 (or you can also use Spots mode). If you don’t use a high shutter speed, a slight flick of a tail or head movement will leave your photos fuzzy.

2) If you can, use a telephoto lens on your SLR.  Or, if you have an optical zoom on your digital compact camera definitely use it. When using a zoom or telephoto lens, you will also need a tripod otherwise your images will lack clarity. And if you are trying to take birds in flight or perched high in trees, professional photographers often use a 600 lens to capture good detail from far away.  Since telephoto lens are expensive, some birders use digiscoping. Digiscoping combines a spotting scope with a digital camera as you can read about here.

Hopefully these few tips can help you attract more birds to your yard and help you capture some truly amazing bird photographs.

Thank you to Luc Viatour for the use of his fabulous images.

Filed Under: News

Insects Pictures – How to Take Good Insect Pictures

February 12, 2010 By Alisha

Today’s post is all about the wonderful world of “bugs.” That’s right- bees, butterflies, dragonflies, beetles, spiders and so many others that help “make the world go round.”

Since  insects often get a bad rap, here are some simple tips on how you can take some fascinating insect pictures.  So, let’s give these little bugs the attention they deserve.

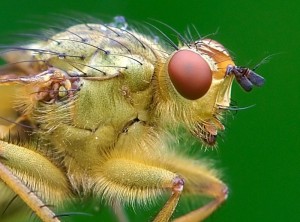
Photo Courtesy of Luc Viatour

Tip #1- Macro Time

This may be stating the obvious, but you need to use a macro lens or macro mode. Stay within the macro range and keep the camera extremely still and you’ll get some nice sharp images. If you’re not sure how close to get, look at your camera manual.

Tip #2 – Don’t Breathe

When taking up close pictures of insects you will need to hold your breath. That’s because most insects are sensitive to carbon dioxide and will fly or run away if you breath directly on them. There are some exceptions to this rule as some beetles will actually freeze if you breathe on them. However, once you breathe on them and they take off it’s too late to get their shot so it’s generally best to hold your breath.

Tip #3 – Start Early

Insects actually slow down with cooler temperatures, so if you want to make it easier on yourself take pictures early in the morning or at twilight when the temperatures are cooler.

Tip #4 – Watch Your Shadow

Insects can see shadows very well so never approach them from the same direction as the light casts. They’ll spot your shadow quickly and will be sure to take off before you even get your camera out.

Photo Courtesy: Luc Viatour

Tip #5 – Proper Composition

Just like any close up picture you should use proper composition techniques. By filling the frame with the subject and using composition techniques like “rule of thirds” you can make sure to shoot an eye catching photograph.

Tip #6- Know Your Insect

Anytime you’re taking pictures of wildlife -whether animals or insects- you should have a basic understanding of your subject. By understanding their patterns of behavior and what types of plants or environments they prefer you’ll be more likely to get a good shot. You should also know if the insect you’re shooting is poisonous or dangerous as there are some types of spiders and insects with powerful or lethal venom. Sure, it may be unlikely but it is always worth knowing.

Insects can certainly be one of the most challenging subjects to photograph so hopefully these simple tips will help you photograph a truly eye catching image.

Thank you to Viatour Luc for the use of his two insect images!

Filed Under: Photography Tagged With: insects

Mastering Landscape Photography Tips

February 8, 2010 By Alisha

If you’re interested in mastering landscape photography then there are two important keys to taking great landscape pictures: lighting and composition. Since both of these important concepts can make an enormous difference in the quality and appeal of your landscape photos, here are some tips you can start using right away.

Quality of Light

Lighting quality can make a significant difference in the quality and impact of your photograph. You want to get familiar with the different types and intensities of lights  so you can best use them to enhance your landscape photograph.

Here are some tips for how you can use different types of light:

  • For lighting that is soft and has an even, warm look take your landscape pictures during the “Golden Hours” which is the first hour after dawn and the last hour before sunset.
  • For more intense colors and subdued highlights, shoot under an overcast sky.
  • For dramatic shadows, shoot under a cloudy sky.
  • For extra eye catching appeal and added drama to your photograph, look for landscapes where there are contrasting colors or tones.
  • For a super soft or ethereal effect, shoot on a foggy day.

Composition

Composition is one of the most important elements in photography and is critical to learn if you want to master landscape photography. There is a lot you can learn about composition, so here are just a few tips you can start applying to your photography right away.

  • Fill two-thirds (2/3) of your frame or viewfinder with the subject of your landscape picture. Your subject could be a rock outcropping, a tree or a dramatic sky.
  • Look for lines, curves or patterns that can draw your eye toward the subject in your landscape photo. For example, it could be a road leading to the subject of your photo or lines in the sand that lead your eye to the subject of your picture.
  • Watch out for clutter or distracting items in the background. This could be anything from litter on the ground to power lines going through your scenic skyline.
  • Compose your photo with a point of interest in the foreground that is separate from your picture’s subject. This is intended to draw the eye in and add interest to your landscape photograph.
  • Position the subject of your photo using the “rule of thirds” so your subject isn’t always directly centered in your photograph. The rule of thirds is a technique where you imagine your picture divided into a grid pattern of 9 equal parts and focus on placing your subject and interest areas along those grid lines or intersections.

Although there is much more to discuss on lighting and composition, these tips will give you a starting point so you can start seeing a difference in the quality of your landscape pictures.

Landscape photographs courtesy of Byron Lee.

Filed Under: Photography Tagged With: landscape photography

  • 1
  • 2
  • Next Page »

Categories

  • Commentary (15)
  • Contests (1)
  • Crafts (1)
  • Easels (2)
  • Featured Artists (5)
  • News (99)
  • Photo Albums (1)
  • Photography (17)
  • Picture Frames (32)
  • Preservation (4)
  • Software (1)
  • Summary (66)
  • Tutorials (1)
  • Video (1)

Recent Posts

  • 7 Ways We Can Help Children Evolve
  • What Is Transitional Style And Why You’ll Love It
  • How To Stop Procrastinating After 50
  • Decorating a Small Home on a Budget
  • 10 BEAUTIFUL FALL IDEAS TO DO NOW

Archives

  • October 2021
  • September 2021
  • July 2021
  • May 2021
  • April 2021
  • March 2021
  • February 2021
  • January 2021
  • August 2017
  • July 2017
  • June 2017
  • May 2017
  • April 2017
  • February 2017
  • January 2017
  • November 2013
  • October 2013
  • August 2013
  • June 2012
  • April 2012
  • March 2012
  • February 2012
  • June 2011
  • May 2011
  • April 2011
  • July 2010
  • June 2010
  • May 2010
  • April 2010
  • March 2010
  • February 2010
  • January 2010

Customer Service

  • Contact Us
  • Frequently Asked Questions
  • Returns

Company Information

  • Out Story
  • Customer Feedback
  • Back to Our Store
  • In the Press
  • Articles

Join Our Frame Club

Sign up for sales and specials
  • Security Verified Seal
  • Yourpictureframes.com is a BBB Accredited Business. Click for the BBB Business Review of this General Merchandise - Retail in Auburn CA

Copyright © 2025 Your Picture Frames